Outing - Taman Tropika UTM (Tasek UTM)


Tempat : Taman Tropika UTM
Masa : 4.30pm-6.30pm (class maa)

Task to Do !
  • Simplicity
  • The Rules of thirds
  • Lines
  • Balance
  • Framing


Simplicity

I got it.. but I crop it only.. .. Aci tak ni??? Hehe.. aci aci laaaa…

Original Pic


After Crop


The Rules of Thirds


Lines

Balance

Framing

p/s: Any comment??? ada rasa bertmbah baik dr yg sblom ni ker???

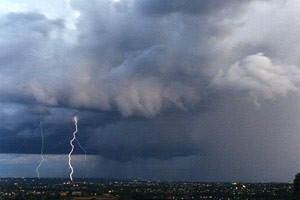
Info about "Lightning Photo"


Night Time Lightning Photography

  • Set your camera on a tripod.
  • Connect a cable shutter release or set the remote for taking the shots.
  • Lock focus at infinity.
  • Set the shutter speed to bulb 'B' (the shutter will stay open for as long as you hold it open). If you don't have this option, set the exposure time to the longest possible - realistically you need 10 to 30 seconds
  • Set the aperture (F-stop) to between F2.8 and F5.6. Experiment a little with different settings but I recommend nothing higher than F8 unless you want many bolts of lightning to occur in the one photo.
  • Frame the picture where the most lightning is occurring, or where the most spectacular clouds are.
  • Observe the lightning for a short while before taking a picture. You will notice that some cloud to ground (CG) lightning strikes very fast (in a fraction of a second it has flashed and gone). Other CG bolts strobe or pulse for anything up to 2 seconds. Sheet lightning (anvil crawlers) sometimes lasts up to a second or more as it spreads across the sky. If the storm is close to you and/or you can see it growing or moving, then exposure times should be at most 15 seconds, or else the cloud will blur (especially if more than one lightning bolt occurs during the exposure). If the storm is a fair way away, you are only framing the storm base, or you cannot see it developing or moving, then exposures can be anything you like! I recommend between 20 seconds and 2 minutes. You can have longer exposure times for higher F stops.
  • For the 'fast' lightning:

    - Press the cable/remote to open the shutter.
    - Wait for the lightning (or multiple lightning) to occur within the frame of your shot.
    - Release the shutter.
  • For the longer lasting lightning:

    - You can do the same as above, or
    - Wait for the lightning to occur.
    - Press the cable/remote to open the shutter as soon as you see the flash.
    - Release the shutter after a number of seconds (up to you).
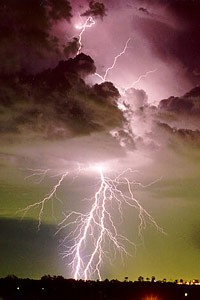


Late Afternoon or Early Morning (low daylight) Lightning Photography

  • Set your camera on a tripod.
  • Connect a cable shutter release or set the remote for taking the shots.
  • Set focus to infinity.
  • Set the shutter speed to 'B' if you want to control the length of the exposure, otherwise I recommend setting the speed to aperture priority setting if you have this.
  • Set the aperture (F-stop) higher (experiment with F5.6 - F16) than for night shots - it will give you more exposure time, and more chance of capturing the lightning.
  • Frame the picture where the most lightning is occurring, or where the most spectacular clouds are.
  • Either wait for the lightning to occur then press the cable/remote to open the shutter, or press the cable/remote and hope that lighting occurs reasonably quickly.
  • If you have set the speed to automatic then that's it, otherwise, release the shutter after your estimated exposure time.


Day Time Lightning Photography

There isn't much to tell you here, you have to react quickly and be pointing the camera in the right direction. Observe the lightning before you attempt any shots - if all the bolts are very fast and do not strobe, then you will not be able to react fast enough.
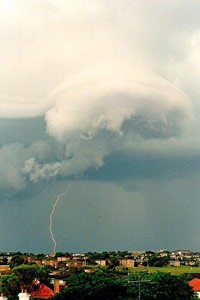
  • Use a normal landscape dial setting, or set the aperture and the exposure time to what you prefer, as you would with any other day time photograph.
  • Lock focus at infinity - you do not want the camera searching for focus before actually taking the picture
  • Aim.
  • Wait for the lightning!! If you react quickly enough when you see the bolt, you may capture it.

One More Option

There is another technique you can try for lightning photography. If your camera has a fast continuous shooting mode - you can always just do a continuous shoot and hope that lightning occurs during that time. It does require a lot of discarding of images afterwards, but you may be rewarded with a fully branched daytime CG lightning picture!


Credit to :http://www.lightningphotography.com

Source: http://www.lightningphotography.com/tips.html

Studio Shooting 9 Feb 2011


Salam kawan2 sume.. especially for members MPT 1483..

Semalam, kami belajar berkenaan dengan 'Studio Shooting' gambar studio la bak kata org..hehehee... banyak yang kami belajar seperti jenis2 kamera yang digunakan, pasal lighting, pasal ISO, dan segala bende yang berkaitan..

1. Kamera
Perlu gunakan kamera yang sesuai.... ape ea nama nya kamera smlm..lupe sudaaa... NIKON d3x kot.. yg petak2 tuu besar gtuu...

2. Lightning
'lightning trigger'.. btol kan nama ni?? hehee.. ni utk test dlu pencahayaan n akan kita guna dlm studio shoot lak.. pastu kita guna kabel utk smbungkan dgn ligtning yg besar gedabak tuu...
kalau nak buang bayang plak, try using UMBRELLA white/black nyee... sbb utk pantulan laa.. bende ni berguna if xnak nmpkkan byg tu betol2 sharp..
@ kita juga bleh cuba letakkan flash kat blakang model coz nnt bila di snap, flash kat blakang akan bg chya n bayang xkan klihatan.


3. ISO
Sepatutnya dlm tempat /area yg agak suram @ gelap kene lam 400 ke atas for ISO. tp dlm studio sbb da ade lightning khas, seelok2nya guna 200 je n kebawah.. sbb pencahayaan da cukup banyak.. same ngn kat luarnyee /outdoor.

4. Aperture + Shutterspeed
hurmm..ikut kesesuaian... smlm b4 setkan A n S, kami kena cuba guna kan flash /test dulu flash utk tetapkan aperture n shutter speed. test pakai lightning dlu.. pastu bacaan yg di ambil utk sstu model kita akan gunakan bg set di kamera plak.... (p/s: kalau salah tlg betolkan eaa)


Taraaa.... Hasil daripada aktvti smlm

Cik Ann yg Snap yeaa :-


Model yang over..hahahaaa
(Puan Nazatul)

Model tak Reti Duk Diam
(Encik Ashaari)


Hero2 Malaya
(Ashaari + Kadir)


Tunggu giliran utk di panggil jd model
(Ajai & Nazatul)

Model ni lagii
(Kadir)

Model kita.... cam kene senyum paksa jee
(Lai Kok Hei)


Yang ni mmg kene adee.. Owner bLog:
credit to : Kak Mariani..
sbb beliau yg snap.. tq2..wlpon oVerexpose.. hahaa


Tamat utk minggu ini.....
(p/s: Any comment?? kutuk ke?? nasihat ke?? Pujian kerr?? sume buleh... hheee)

Auto MODE....


All of these using Auto Mode...

Teringin sgt nak amik gmbr potrait..... Enjoy My pic...

1. Majlis Perkahwinan Kak Intan... tp xbalance sbb crown xnmpk..hehehe..sori maaa.. salah snap...

2. wif Zati kat mjls kenduri..

3. Budak Bulat.... HAIKAL


4. Masa Majlis Maulidur Rasul .. makan2 kat umah.. (kenduri kesyukuran)
Anak sape ni????

5. Madihah... baca doa tuu

6. Amirul & Ain

7. Iskandar... giler gmbor..hahaa

BOKEH ---> bunga di UTM n HOMETOWN


Salam rakan-rakan semua...

Alhamdulillah.. after mencuba bnyk2 kali..akhirnya berjaya juga snap BUNGA ni.. wif BOKEH yg cantik... sgt2 truja bila tgk hasilnyaa.....
myb pada pndgn PRO2.. hasil ni xsberapa.. xpe2.. akan belajar dan terus belajar.. yes2.... i can do it!!!


1. Bunga yang di snap di kala senja menjelma.. nak mgrib da time ni... (depan rumah, klate)


2. BUnga apakah ini?? just snap depan rumah kakak.. cantek bunga ni..


3. Taman Tropika UTM.. niat di hati nak snap lebah kerr.. rerama ker.. tp yg hinggap just lalat hijau jeee.. lalat pon lalat lerrr...


4. ni napa ape???


5. at UTM.... nice.. i LIKE..


6. TARaaaaa


p/s: Hope dpt amik gmbr ngn ag cantek n puas ati .....

Nature


'Semakin lama semakin TERUJA'


1. Melihat kerengga bekekrjasama...


2. Snap pas hujan.. cantiknyaa air ni.. ahakzz..


3. Hope boleh snap air menitik... bilaa laa dpt eaa??


4. Tasik blakang (Pusat Kesihatan)


Related Posts Plugin for WordPress, Blogger...